PART 1: Water heater design
|
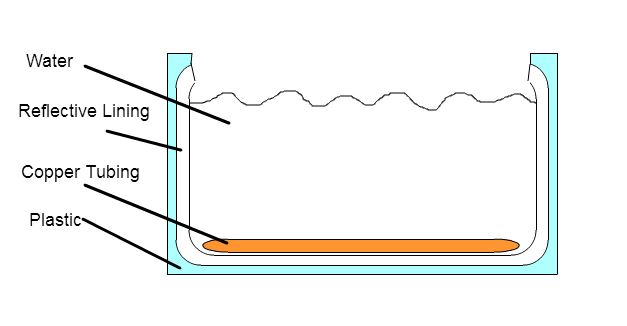
In the first phase of our outdoor classroom project, we were tasked with building a solar water heater. Essentially, this heater would be designed to heat water by using the radiation of the sun. Our group was able to create a great design using several key materials. The result was this design.
We used a plastic insulated box as the housing for our heater. Next, lined the box with reflective material to reflect the radiation into the box. Finally, we added copper pipes the the box to absorb heat. |
|
Part 2: CLIENT needs survey
The second phase of our project was to find out what people wanted from the outdoor classroom. We decided that a survey would be the best option to accurately give the opinion of both teachers and students. We sent out the survey and collected our results. The teachers prioritized a quiet area with WiFi, along with group seating and the students prioritized a quiet space with WiFi as well.
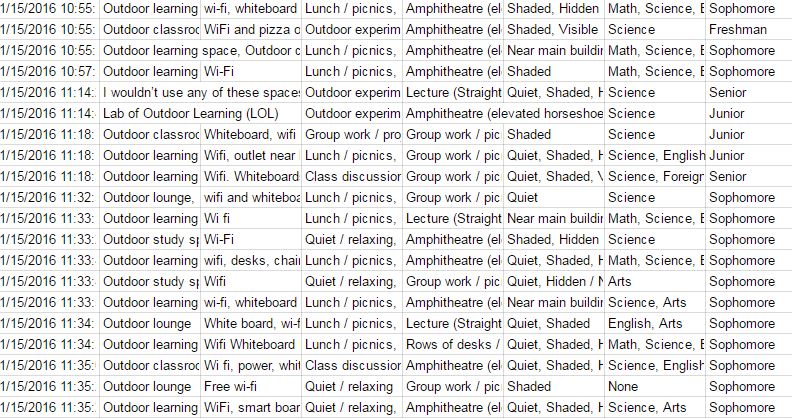
These results helped us realize which features of our design we should add, which aspects of our project we should prioritize, and how we could make everyone enjoy our project.
Part 3: site selection
During the early stages of designing our outdoor classroom, we needed to find a good site to build the space. We made a system to rank the sites we were looking at based on aspects like sunlight, wind and accessibility.
For example:
For example:
Hill Behind the art room: |
Box NEXT To the cafeteria: |
Dirt lot next to the road: |
|
+Accessible
+Sunlight -Uneven ground -Next to road |
+Preexisting foundation
+No wind +Accessible -Limited space |
+Large space
+Even ground +Less wind -Partial sun -Limited access |
PART 4: Materials heat testing lab
The next step in the project was to test materials and discover their thermal properties. This would help us decide which materials to use in our final design. Our results showed that metal heated and cooled faster, while materials like wood and dirt were better at insulating materials. We gradually exposed the materials to a heat source and measured their heat at set intervals.

These results showed which materials were most valuable in which situations.
PART 5: Outdoor classroom design and presentation
The main task of our outdoor classroom project was to create a presentation showing our design and budget for our outdoor space. We created an amphitheater-style floor plan with both group and lecture-style seating. Our design featured an adjustable shade structure and swiveling tables.
3D Model
|
Blueprint
|
My main role in the group was to create a 3D model, scaled exactly to the real thing. We also made a blue print with exact measurements.
OUR PRESENTATION: https://docs.google.com/presentation/d/1nI39oS_pL21PYwAB4qPKiHY8zJCBqyIzlBRd1BgKmnQ/edit#slide=id.p
OUR PRESENTATION: https://docs.google.com/presentation/d/1nI39oS_pL21PYwAB4qPKiHY8zJCBqyIzlBRd1BgKmnQ/edit#slide=id.p
SITE, materials and budget:

Our site was a pre-existing foundation placed in between the bathrooms and the cafeteria here on the San Marin Campus. This site was a good choice because it was clear of wind, in full view of sunlight, and accessible from all parts of the campus.
Our materials consisted of pressure treated wood, triangle canvas sails and, a six foot whiteboard and much more. The list below shows the materials and their price.
Our materials consisted of pressure treated wood, triangle canvas sails and, a six foot whiteboard and much more. The list below shows the materials and their price.
Budget:
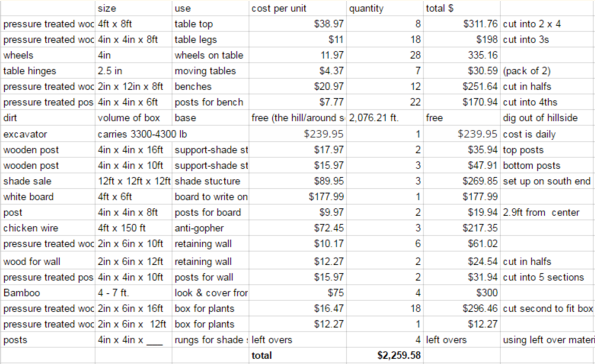
As you can see, our total cost came well below budget. Despite this, we were still able to use quality materials for the building process.
Part 6: WIND TURBIne lab
For this part of the project, we designed and tested different wind turbines and compared them. We then started with a claim, and then proved it with evidence and reasoning.
In a VAWT we found that deeper square shaped pockets produced more wind power that a circular blade. We also found that the shorter the length of the arms on the turbine, the higher the RPM.
We had two designs and data to support our results:
In a VAWT we found that deeper square shaped pockets produced more wind power that a circular blade. We also found that the shorter the length of the arms on the turbine, the higher the RPM.
We had two designs and data to support our results:
|
DESIGN A:
LOW MED HIGH Short: 0.18 0.24 1.55 Long: 0.13 0.15 1.09 |
DESIGN B:
LOW MED HIGH 0.18 0.24 2.55 |
|

|
Reasoning:
Design B worked better because it's square shape helped capture the air and keep it moving. The short sticks worked better because their short radius meant it took less energy to rotate them around the axle.
Design B worked better because it's square shape helped capture the air and keep it moving. The short sticks worked better because their short radius meant it took less energy to rotate them around the axle.
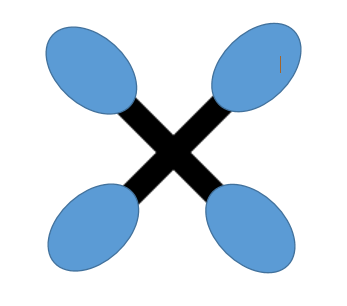
Additionally, I made my own design, but we never git to test it.
My Design:
My Design:

Part 7: energy consumption
For this part of our project, we were assigned an energy source. We were then asked to list the pros and cons of using this energy source. We were assigned Coal and Natural gas.
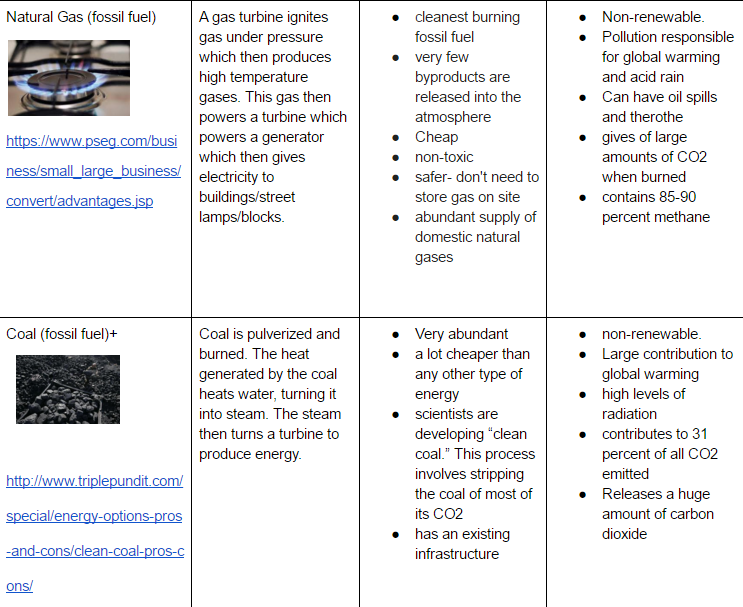
From this we realized that there were many other forms of clean energy available. Things like fossil fuels and coal are abundant, but also leave pollutants and will never last forever. We should also find ways to use less energy.
Physics content:
|
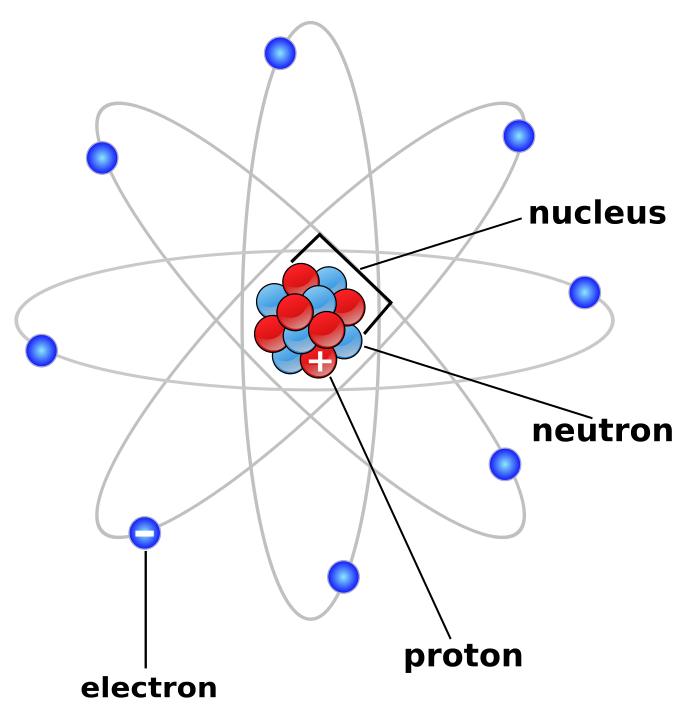
to 1. Atoms, Molecular structure, States of Matter
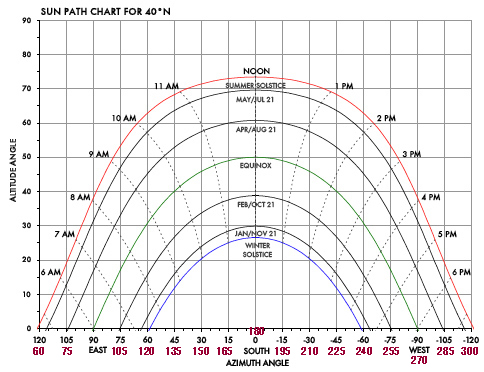
Atom:The smallest component of an element having the chemical properties of the element, consisting of a nucleus containing combinations of neutrons and protons and one or more electrons bound to the nucleus by electrical attraction; the number of protons determines the identity of the element. Molecular Structure: The arrangement of chemical bonds between atoms in a molecule. States of Matter: Solid-Molecules are locked in place and barely move. (Steel) Liquid- Molecules move around fluidly. (Water) Gases- Molecules move the fastest. (Hydrogen) 2. Specific Heat Capacity and Ways Heat is Transferred Specific Heat Capacity: The specific heat capacity is the amount of heat required to change a unit mass of a substance by one degree in temperature. Radiation: Heat transfer through waves and particles. Conduction: Heat transferring through a solid. Convection: Movement of heat through a fluid. Insulation: Opposite of conduction. Resisting the transfer of heat. 3. Angles of the Sun Depending on the location, the angle of the sun can greatly change many aspects of the environment. here in the northern hemisphere, the sun shines at specific angles. We had to use this information to accurately make out shade structure when designing our project. 4. Laws of thermodynamics 0th Law: If two systems are in thermal equilibrium independently with a 3rd system, they must be in thermal equilibrium. 1st Law: Conservation of energy: Energy is neither created or destroyed, but transferred from one form to another. (This includes heat) 2nd Law: Entropy increases. Disorder increases Making everything become the same temperature over time. 3rd Law: Heat always exists. Temperature will never reach zero. |
|
Reflection
Throughout this project, there were many problems and many good moments. for example, I thought that we really payed attention to detail while we were doing this project. That was really important because we had to have and exact budget, a scale model and durable materials. On the other hand, there were some aspects that we could've improved upon. For example, I thought that our organization towards the end of the project could've been better. Even on presentation night, we couldn't even find each other at first. As for myself, I know that I definitely has some good and bad aspects of my work. For example, I definitely could've helped out more with various tasks. I also should've had a better attitude. I also did well in some areas. For example, I worked for hours to create a scale 3d model of the outdoor classroom. When we made changes I had to start all over again. It was difficult to stay motivated.
